Features
Incidents
Learn how to report and manage incidents to keep your customers informed
Incidents are how you communicate service disruptions to your customers. When something goes wrong, creating an incident keeps your users informed about what's happening and when they can expect a resolution.
What is an Incident?
An incident is a record of a service disruption or issue that affects your customers. It includes:
- A title describing the problem
- The current investigation status
- The impact level (how severe the issue is)
- Which components are affected
- Updates as you investigate and resolve the issue
Incidents are displayed on your public status page so customers can see what's happening without contacting support.
Incident Lifecycle
Incidents progress through these statuses:
| Status | Description |
|---|---|
| Investigating | You've identified an issue and are looking into it |
| Identified | You've found the root cause of the problem |
| Monitoring | A fix has been implemented and you're watching for issues |
| Resolved | The incident is fully resolved |
Impact Levels
Each incident has an impact level that indicates severity:
| Impact | Description | Component Effect |
|---|---|---|
| Minor | Small impact, most users unaffected | Sets affected components to "Degraded Performance" |
| Major | Significant impact, many users affected | Sets affected components to "Partial Outage" |
| Critical | Severe impact, service is down | Sets affected components to "Major Outage" |
Note: When creating or editing an incident, component statuses are limited to Degraded Performance, Partial Outage, and Major Outage. The "Operational" and "Under Maintenance" statuses are not available since incidents represent service disruptions, not normal operation or planned maintenance. Use Scheduled Maintenance to set components to "Under Maintenance".
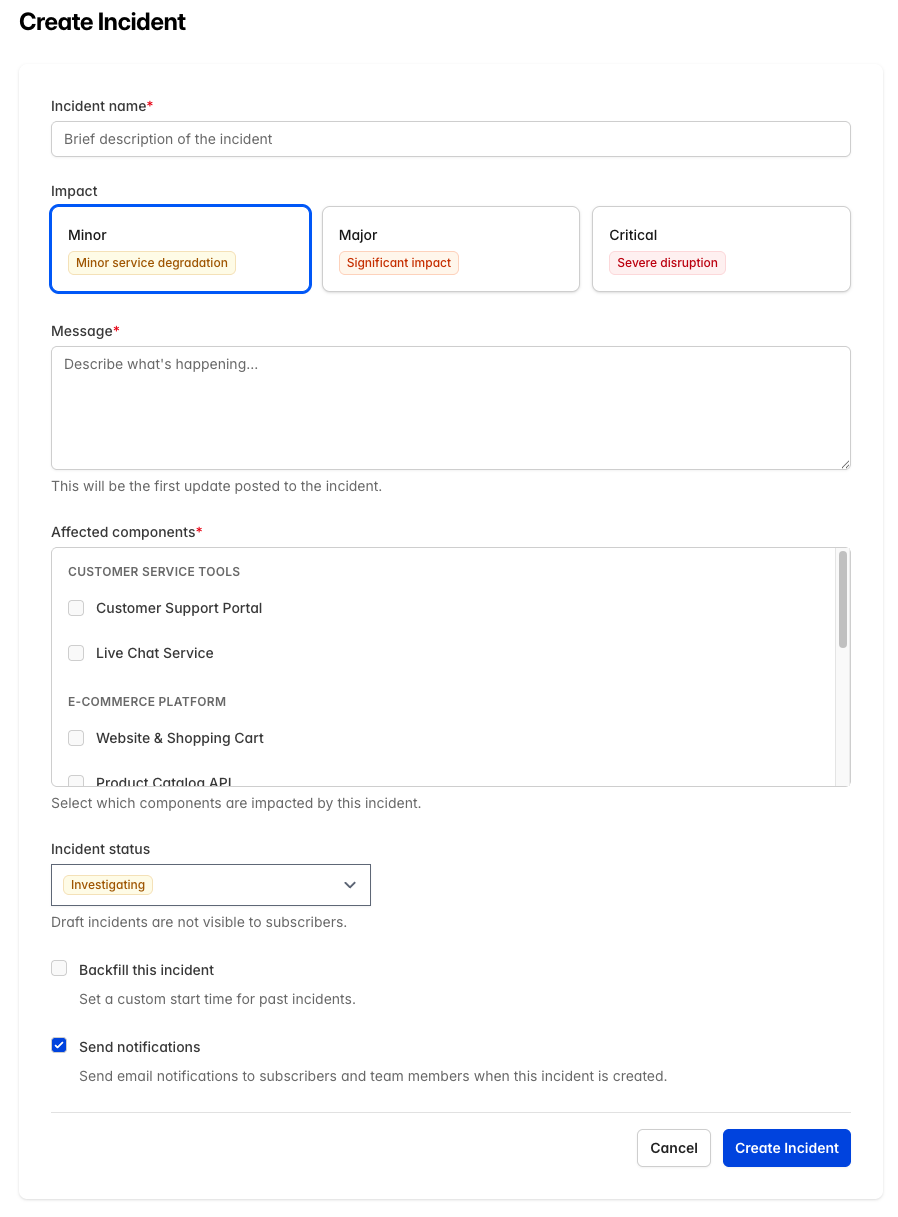
Creating an Incident
To report a new incident:
- Click Incidents in the sidebar (or use the Create Incident quick action on the Dashboard)
- Click Create Incident
- Fill in the incident details:
- Incident name: A brief, clear description of the issue
- Impact: How severe the issue is
- Message: More details about what's happening
- Incident Status: Current investigation status (defaults to "Investigating")
- Select the affected components
- Choose whether to Backfill this incident by setting a custom start time
- Choose whether to Send notifications (see below)
- Click Create Incident
Send Notifications Checkbox
The Send notifications checkbox controls whether email notifications are sent when the incident is created:
| Checkbox State | Result |
|---|---|
| Checked (default) | Subscribers and team members receive an email notification about the new incident |
| Unchecked | No notifications are sent - the incident is created "silently" |
When to create a silent incident:
- Backfilled incidents: Recording past issues for historical accuracy
- Internal tracking: Issues you want to document but not publicize
- Minor issues: Problems you're monitoring but don't warrant customer notification yet
When posting updates to any incident, the "Send notifications" checkbox defaults to checked. Each update is a deliberate action, so subscribers are generally notified. You can uncheck the box per-update if needed.
Draft Incidents
You can save an incident as a draft before publishing it:
- Drafts are not visible on your public status page
- Drafts don't send notifications to subscribers
- Use drafts to prepare incident communications before publishing
To publish a draft, edit the incident and click Publish Incident.
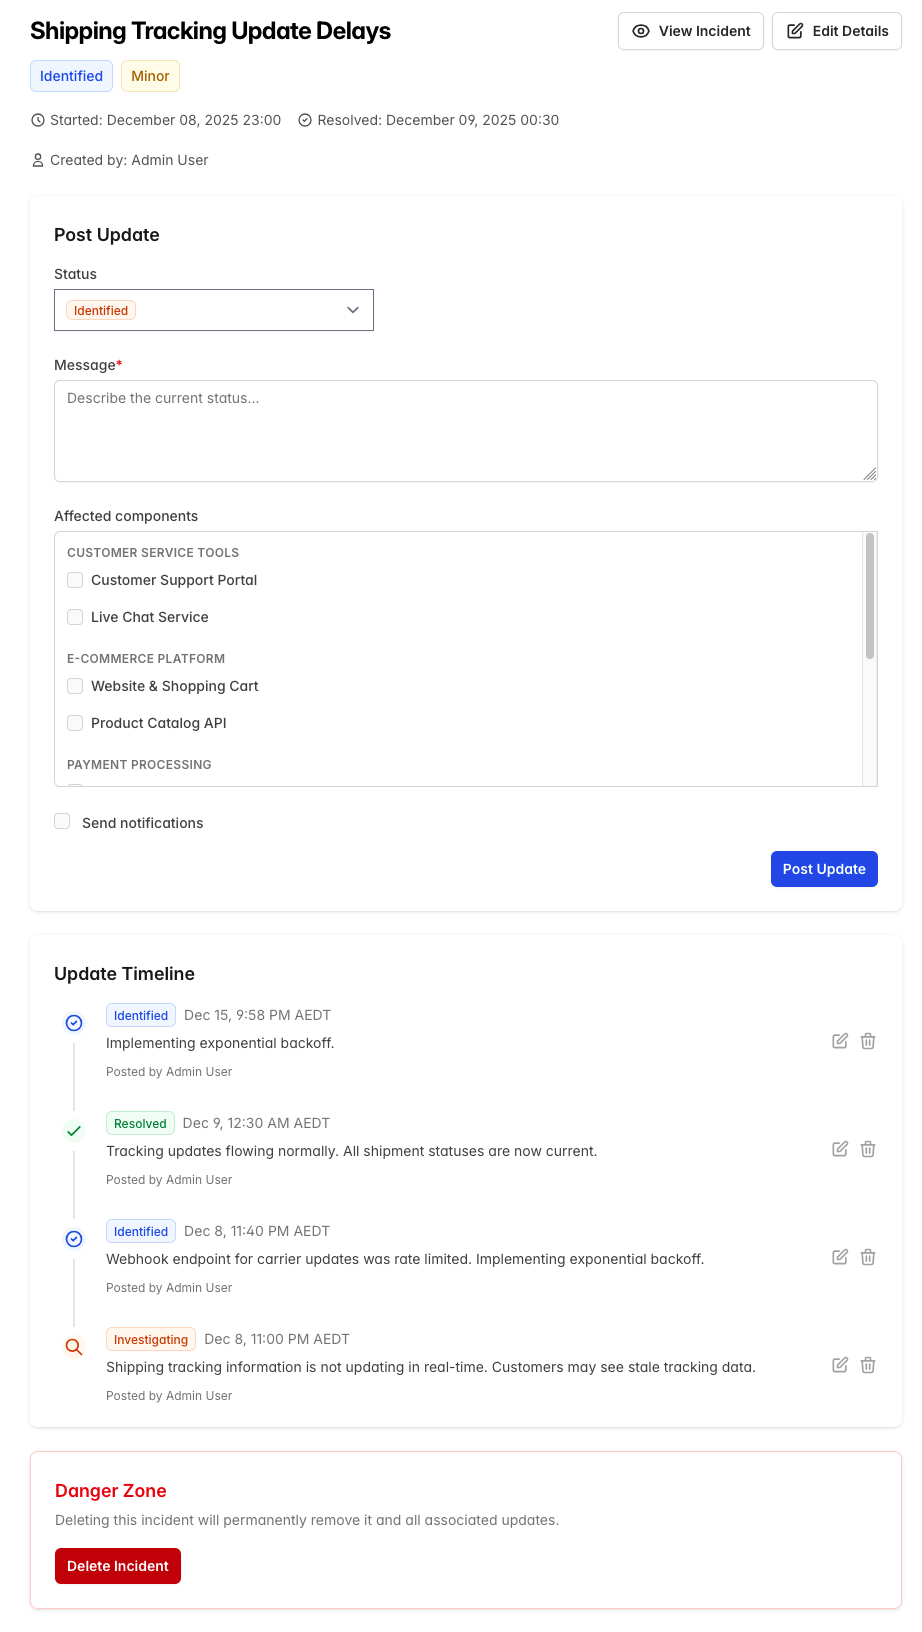
Adding Incident Updates
As you work on resolving an incident, add updates to keep your customers informed:
- Click Incidents in the sidebar
- Click the edit icon (pencil) on the incident row
- In the Post Update section (left panel):
- Select the new Status (Investigating, Identified, Monitoring, or Resolved)
- Enter your Message describing the current situation
- Check or uncheck Send notifications as needed
- Click Post Update
The Send notifications checkbox on the update form:
- Defaults to checked for all updates
- Each update is a deliberate action, so subscribers are generally notified
- Can be unchecked per-update if you want to post silently
Update Best Practices
- Post updates regularly, even if there's no new information
- Use clear, non-technical language
- Include an estimated time to resolution when possible
- Acknowledge the impact on customers
Example updates:
Investigating: We're aware of issues with our API and are investigating. We'll provide an update shortly.
Identified: We've identified the cause as a database connectivity issue. Our team is working on a fix.
Monitoring: A fix has been deployed. We're monitoring the situation to ensure stability.
Resolved: This incident has been resolved. API functionality has been fully restored. We apologize for any inconvenience.
Resolving Incidents
To resolve an incident:
- Open the incident
- Click Add Update
- Enter your resolution message
- Change the status to Resolved
- Click Post Update
When an incident is resolved:
- It moves to the incident history on your status page
- Affected component statuses are restored to operational (if no other incidents are affecting them)
- Subscribers receive a resolution notification
Resolved Incidents Cannot Be Reopened
Once an incident is resolved, it cannot be changed back to an active status (Investigating, Identified, or Monitoring). This is by design to:
- Preserve accurate metrics: Reopening old incidents would skew MTTR (Mean Time to Resolution) calculations and uptime statistics
- Maintain clear timelines: Each incident represents a specific event with a defined start and end time
- Ensure data integrity: Historical incident records remain accurate for reporting and compliance
What you can still do with resolved incidents:
- Add postmortem notes and follow-up updates (the status will remain "Resolved")
- Edit incident details like title and component associations
- View the complete incident timeline and history
If a similar issue recurs: Create a new incident rather than reopening the old one. This provides accurate tracking of each occurrence and clearer communication to your customers about the current situation.
Viewing Incidents
CheckStatus provides several views for managing incidents:
Open Incidents
Shows all active (non-resolved) incidents. This is your primary view for managing ongoing issues.
All Incidents
Shows all incidents, including drafts and resolved ones. Use the filters to find specific incidents:
- Search: Find incidents by title
- Components: Filter by affected components
- Date range: Filter by when incidents started or resolved
Resolved Incidents
Shows only resolved incidents with filtering options.
Incident Notifications
When the Send notifications checkbox is checked, CheckStatus notifies:
- Subscribers: Email notifications to people who've subscribed to your status page
- Team members: Email notifications to all users in your account
- Webhooks: Automated notifications to external systems (if configured)
Who Receives Notifications?
| Event | Recipients (when notifications enabled) |
|---|---|
| Incident created | Subscribers + Team members |
| Incident updated | Subscribers + Team members |
| Incident resolved | Subscribers + Team members |
Silent Incidents
When you uncheck "Send notifications", the incident is created silently:
- No emails are sent to subscribers or team members
- The incident still appears on your public status page
- Webhooks are also suppressed
- Future updates still default to sending notifications (checkbox checked), but can be unchecked per-update
This is useful for:
- Recording historical incidents (backfills)
- Internal tracking without customer notification
- Gradually escalating communication
Learn more about notification settings →
Backfilled Incidents
Sometimes you need to record an incident that occurred in the past. Backfilled incidents allow you to:
- Document past issues for historical accuracy
- Maintain accurate uptime records
- Create incidents for issues you discovered after the fact
When creating an incident, you can set a custom start time to backdate it.
Incident Limits by Plan
| Plan | Monthly Incidents |
|---|---|
| Free | 30 |
| Starter | Unlimited |
| Growth | Unlimited |
| Pro | Unlimited |
The Free plan shows a usage indicator when you're approaching the monthly limit.
Best Practices
Writing Incident Titles
- Be specific: "API returning 500 errors" not "API issues"
- Keep it brief but descriptive
- Use customer-friendly language
Communication Guidelines
- Acknowledge the issue promptly
- Be honest about what you know and don't know
- Provide regular updates, even if just to say you're still working on it
- Thank customers for their patience
- Explain what you've done to prevent recurrence
Component Status Management
- Only mark components as affected if they're actually impacted
- Consider the appropriate impact level carefully
- Update component statuses as the situation evolves
Related Topics
- Components - Set up components to track
- Scheduled Maintenance - Plan maintenance windows
- Subscribers - Manage who receives notifications
- Notifications - Configure notification settings